Crispy Fried Maple Brussels Sprouts with Bacon

Close up shot of crispy brussel sprouts

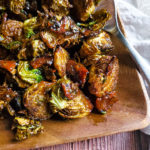
Crispy Brussels sprouts coated in warm maple syrup and tossed with bacon will turn any Brussels sprout hater into a #1 fan!

Brussels sprouts are a vegetable hated by many. I’ve learned that the deep fried version of any veggie tastes much better than when steamed. Now, steamed Brussels sprouts are nasty. Let’s be real. BUT, Brussels sprouts with bacon, AND deep fried? Count me in!

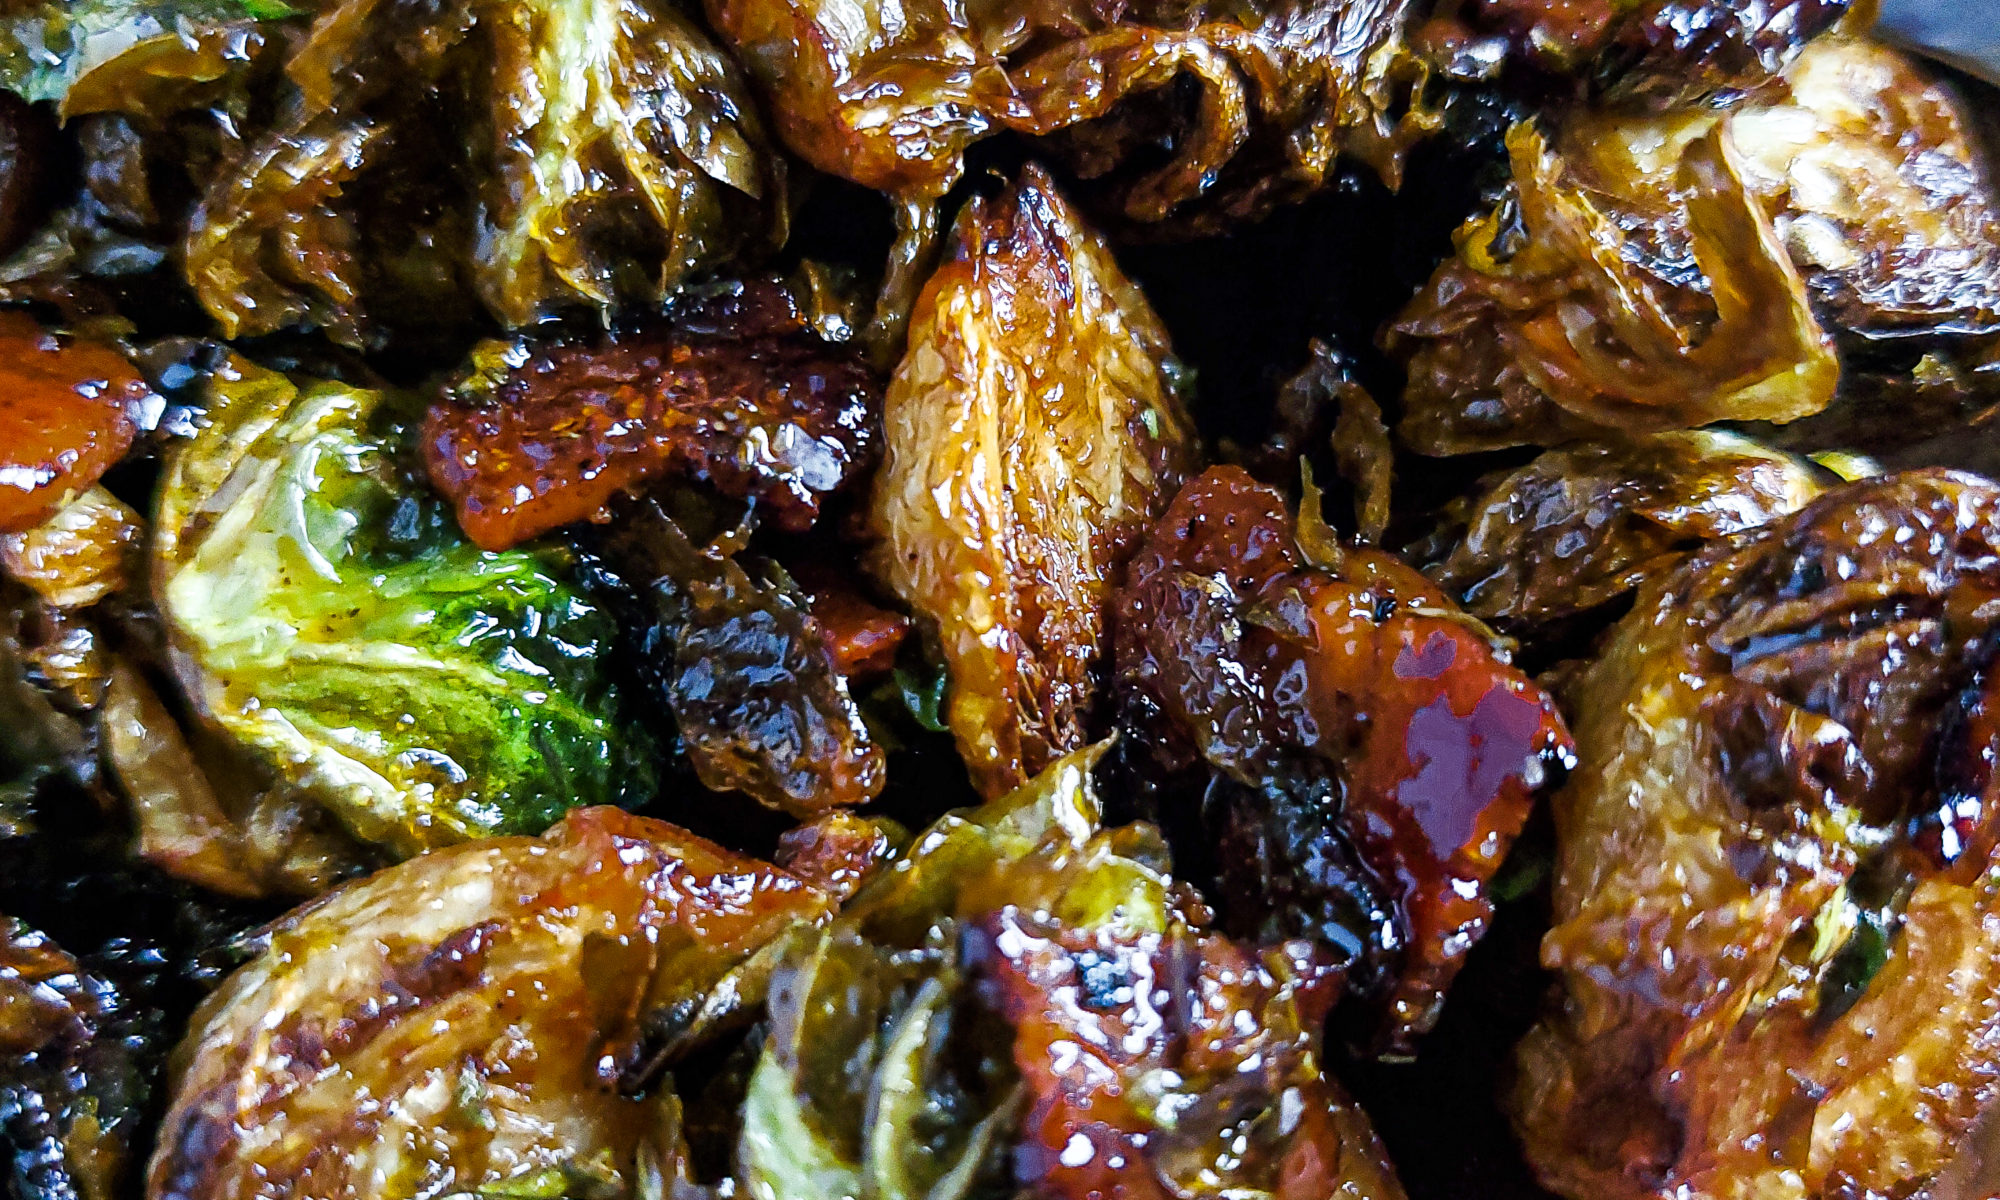
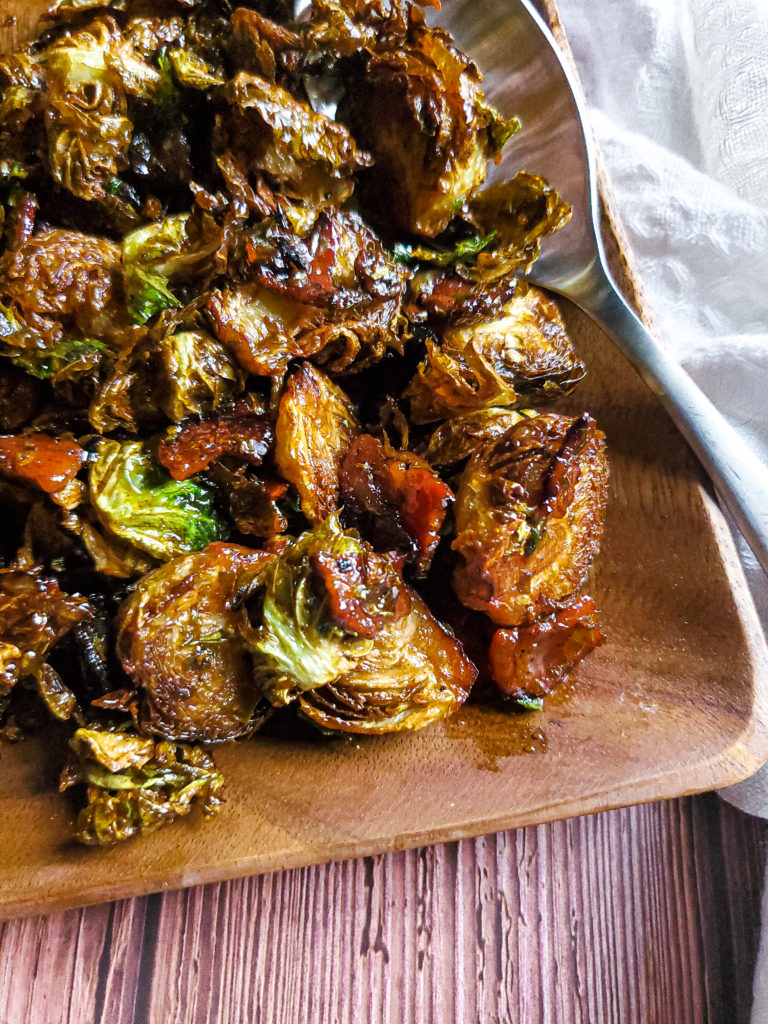
The Brussels sprouts are deep fried until they are crispy. Some leaves are also separated and fried to a texture similar to kale chips! The sprouts are then tossed with bacon-infused maple syrup. This sweet and salty combo is always a winner and works so well for this vegetable side dish.

Close up shot of crispy brussels sprouts with bacon

How to clean and trim the Brussels sprouts

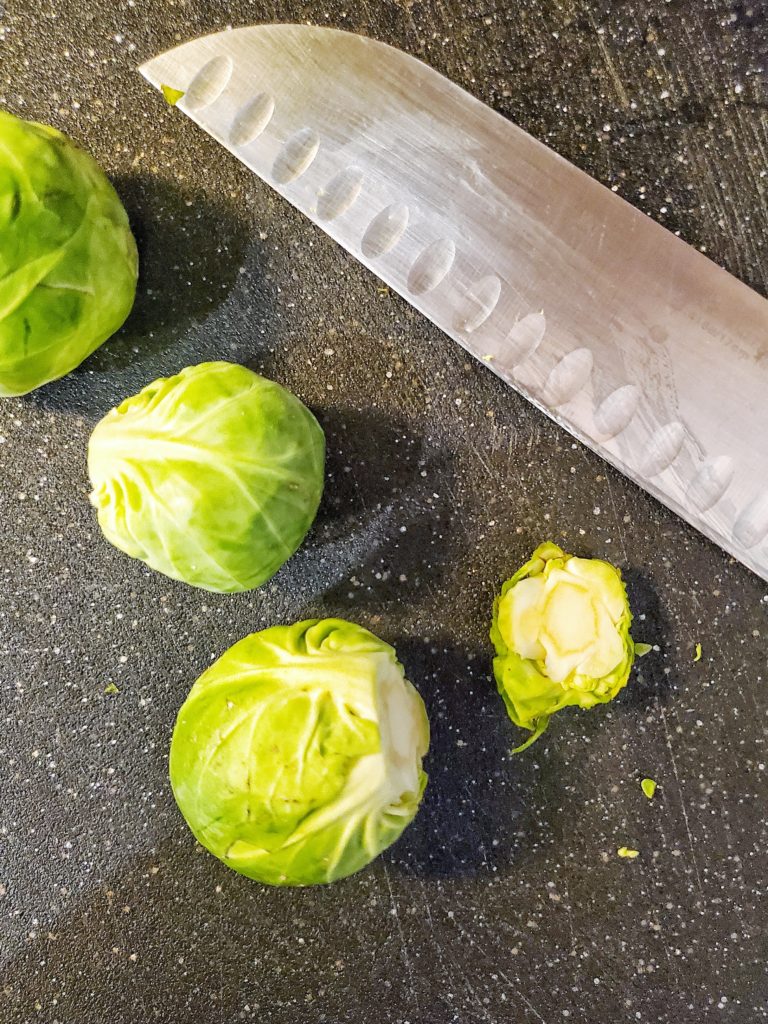
The Brussels sprouts need to be cleaned properly before cooking. To do this:

  • Cut off the root of every Brussels sprout. Some leaves naturally fall off when the root is removed. Set these aside.
  • Cut each one lengthwise in half, from the top to the root.
  • Gently remove some more leaves from the halved Brussels sprouts. Put them aside with the other leaves that fell off.
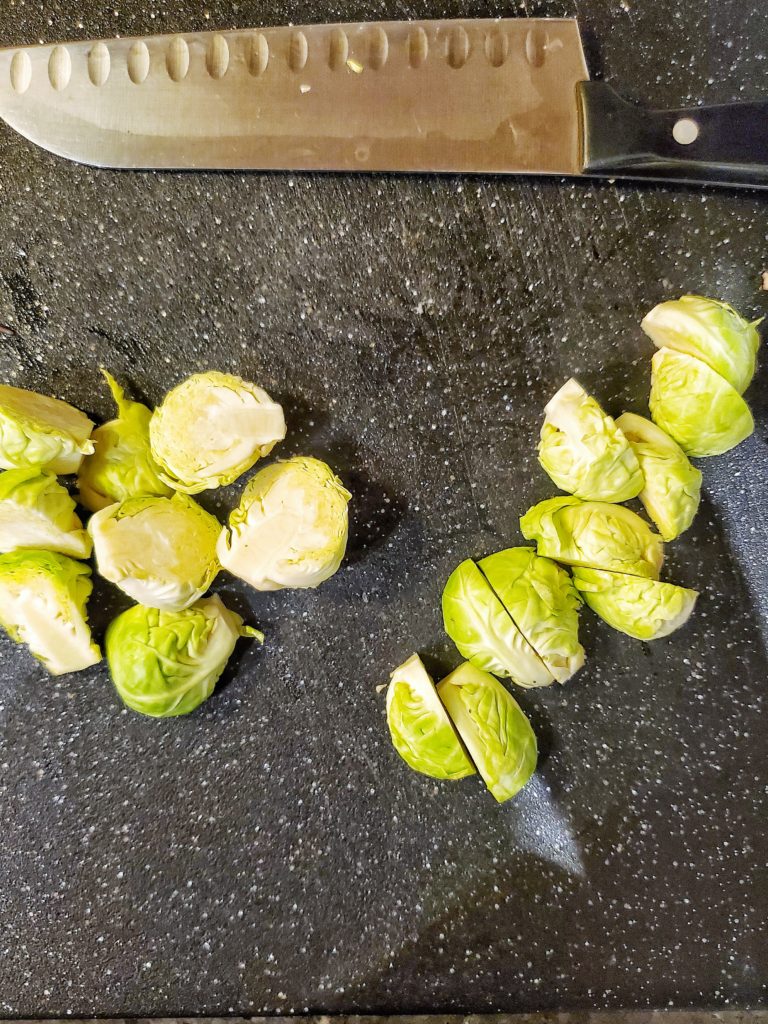
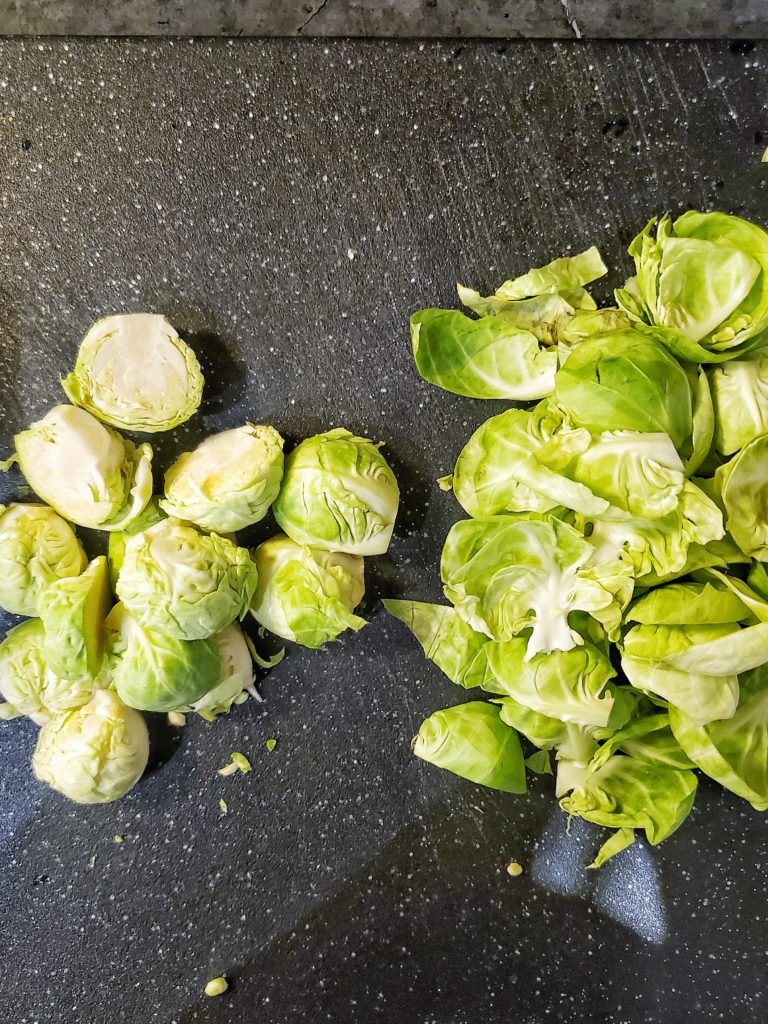
  • Rinse the leaves and halves under cold running water.
  • Place the rinsed Brussels sprouts on a tray or plate lined with paper towels. Add more paper towels on top and gently pat dry. 
  • Remember: NOT toss the individual leaves once they have been cleaned! The leaves are fried separately from the halves for this recipe.
Cutting off Brussels sprout roots
Remove the root of the Brussels sprouts
Brussels sprouts halves on a cutting board
Cut the Brussels sprouts in half
Brussels sprouts halves and leaves on a cutting board
Pull off a few more leaves, and separate from the halves

How to make the maple bacon sauce

The maple bacon sauce for the fried Brussels sprouts is very easy to prepare!

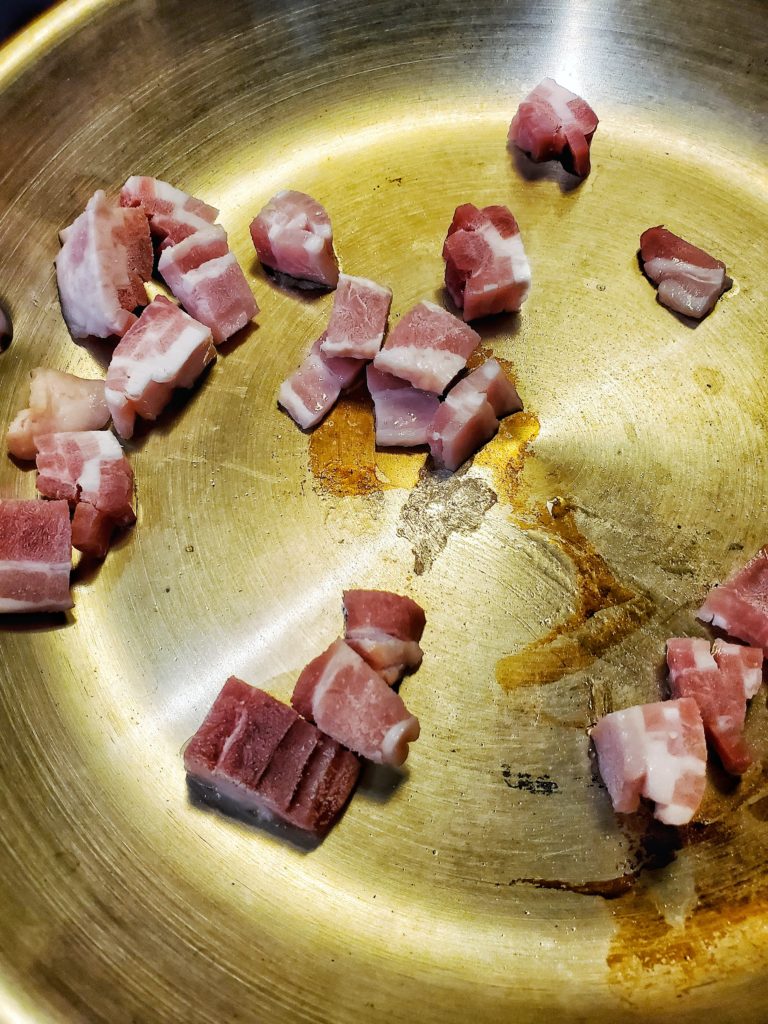
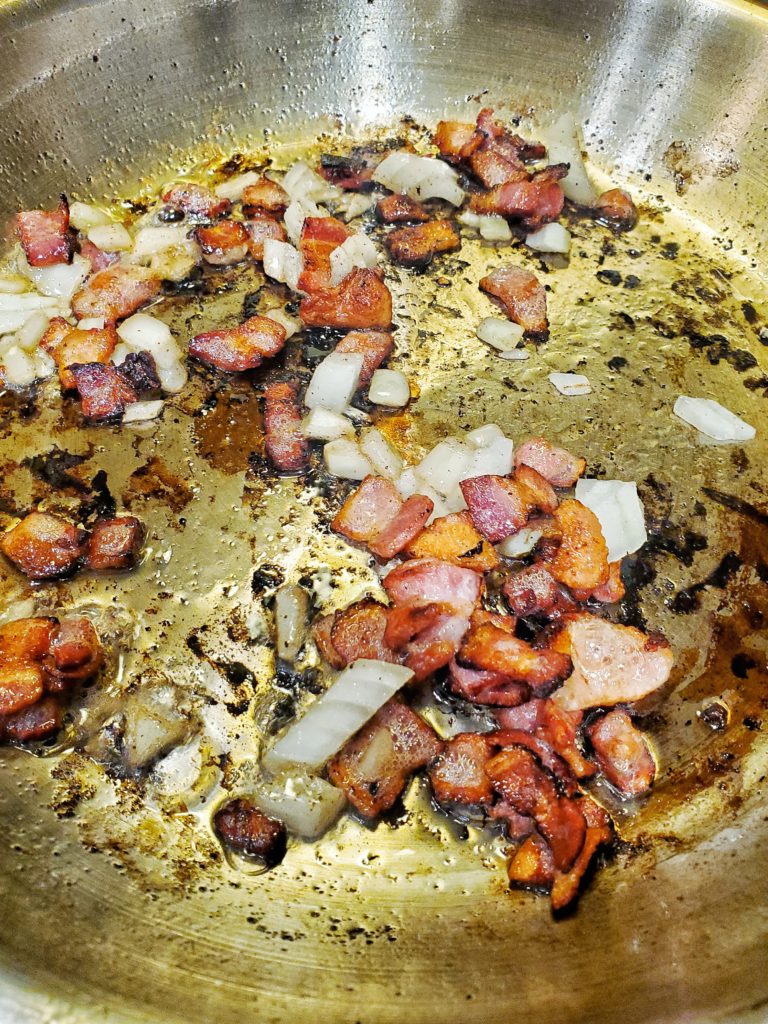
  • Diced bacon is cooked in a small pan on medium heat. Saute the bacon until it is cooked most of the way.
  • Add diced onions and cook for a minute. At this stage, the bacon is cooked fully.
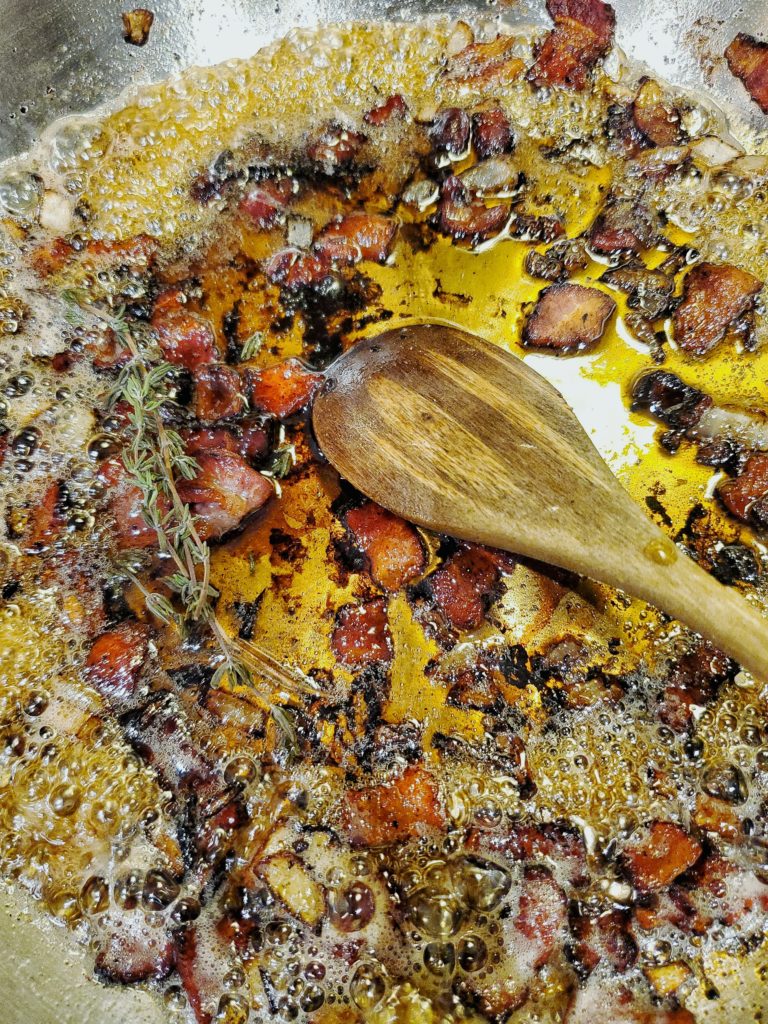
  • Pour maple syrup into the sauce pan and simmer for a minute.
  • Keep the maple bacon sauce in the pan until it is ready to be tossed with the fried Brussels sprouts.
Raw diced bacon in a saute pan
Add diced bacon to the saute pan
Diced bacon and onions cooking in a saute pan
When bacon is mostly cooked, add the diced onions
Maple syrup, bacon, and onions cooking in a saute pan
Finally, pour maple syrup with the cooked bacon and onions

Can these Brussels sprouts with bacon be made pork free?

If there is no pork on your fork, the bacon can be completely omitted. Some of the smoky flavor will be missing, so add a dash of paprika or a drop of liquid smoke to the maple syrup while cooking. 

Turkey bacon can also replace pork bacon. Pork bacon has a higher fat content, so add another teaspoon of olive oil so that the turkey bacon does not burn.

Maple syrup substitution 

Maple syrup may be a bit expensive for some. No worries. Pancake syrup can be used instead. But the end product will taste much better when used with maple syrup. 

What should I serve with the crispy fried Brussels sprouts with bacon?

The Brussels sprouts pair well with roasted chicken or pork. A piece of salmon is also an excellent option. Steamed rice or creamy mashed potatoes are a nice starch to complement the meal!

Or you can eat a bowl full on it’s own, like I did when testing out this recipe. No judgment here…they’re THAT good!

Looking to use maple syrup in another recipe? Give my Sweet Potato Cornbread with Maple Bourbon Butter a try! And don’t forget to share your creations with me on Instagram or Twitter!

Close up shot of crispy brussel sprouts
Print Recipe
5 from 10 votes

Crispy Fried Maple Bacon Brussels Sprouts

Crispy Brussels sprouts coated in warm maple syrup and tossed with bacon will turn any brussel sprout hater into a #1 fan!
Prep Time10 minutes
Cook Time15 minutes
Course: Appetizer, Side Dish
Cuisine: American
Keyword: bacon, brussel sprouts, brussels sprouts, maple, side dish, side dishes, vegetables, veggie, veggies
Servings: 4 servings
Author: Crystal

Equipment

  • deep fryer or pot safe for deep frying
  • tray with paper towels
  • knife and cutting board
  • small pan
  • wooden spoon or rubber spatula
  • medium sized mixing bowl

Ingredients

  • 2 cups canola oil for deep frying
  • 1 pound Brussels sprouts
  • 2 teaspoon olive oil
  • 4 bacon strips diced
  • ¼ cup diced onion
  • ½ cup maple syrup
  • 1 sprig of thyme
  • ½ teaspoon kosher salt
  • ¼ teaspoon black pepper

Instructions

  • Heat canola oil in a deep fryer to 350 degrees.
  • While the oil is heating, prep the Brussels sprouts by cutting the roots of each. Next, cut each sprout in half. Gently peel off and set aside any leaves that naturally fall off. Rinse the leaves and halved Brussels sprout under cold water, keeping them separate. Place them onto a tray lined with paper towels, layering more paper towels on top and pat dry. Set aside.
  • Heat the olive oil in a small pan on medium heat. Saute the diced bacon for 4-5 minutes, stirring occasionally until slightly under cooked.
  • Add the diced onions and cook for 1 minute, stirring occasionally. Pour in the maple syrup and add the sprig of thyme. Turn the heat to low and simmer for 1 minute. Remove from the heat.
  • Once the frying oil is at the correct temperature, add the halved brussel sprouts 2 batches. Fry for 2 minutes. Remove and drain the brussel sprouts and place into a medium sized mixing bowl.
  • Fry the Brussels sprout leaves in the same oil for one minute. Remove and drain, and add with the Brussels sprout halves. Sprinkle with salt and pepper and toss with a large spoon.
  • Remove the thyme sprig from the maple syrup sauce. Pour over the fried brussel sprouts and mix together with a spoon.
  • Serve immediately.

Creamy Hot Cocoa with Chocolate Hazelnut Spread

Close up picture of 3 mugs full of hot chocolate

Hot chocolate is a staple during the colder months. A cup of creamy hot cocoa made with chocolate hazelnut spread and a hint of cinnamon is a great way to warm up!

Overhead shot of 3 cups of hot cocoa with marshmallows

Not sure what part of the country you’re reading this from. I’m guessing it’s as cold as a penguin’s bootyhole where you’re located since you’ve stumbled across this recipe. However, hot cocoa is a year round treat for me. Maybe that’s what also brought you here, and of course I understand. I would drink a cup of hot cocoa everyday if my skin would allow it, but once a week works too.

The chocolate hazelnut spread makes the hot cocoa a bit richer, almost as if you’re drinking the spread. A pinch of ground cinnamon gives it a hint of spice, warming up the flavor a bit more. 

What is chocolate hazelnut spread?

Chocolate hazelnut spread is a smooth blended mixture of cocoa powder, hazelnuts, sugar, vanilla, and palm oil, blended until smooth. The spread is the same consistency as peanut butter and is commonly used in desserts as well as breakfast. 

There are several brands with their own version of this chocolatey goodness, but the most popular brand is Nutella. Use any brand you’d like for this hot cocoa. 

How to make hot cocoa

Hot chocolate is super easy to make! Simply heat the ingredients in a small pot while whisking.

A bit of the milk is poured in with the dry ingredients while whisking to prevent clumping. Once all the milk is in, warm the mixture and add the chocolate hazelnut spread to melt.

Lastly, immediately remove the pot from the heat when steam forms. You don’t want the hot chocolate to be too hot to drink. In case it overheats, let it cool for a few minutes in a mug to cool down a bit before consuming. 

The best type of milk to use for hot cocoa

Hot chocolate works with whatever milk you have available. 2% milk is a staple in my home, which I use for this recipe. If you want to use skim or whole, you’ll be good to go. 

Premade hot cocoa mix

No need to keep packets of hot chocolate in your pantry any more. The dry ingredients in the recipe can be mixed ahead in a larger batch!

For a batch of hot chocolate mix, combine:

  • 5 tablespoons plus 1 teaspoon granulated sugar
  • 10 tablespoons plus 2 teaspoons cocoa powder
  • 2 teaspoons ground cinnamon

The hot chocolate mix is very shelf stable. The shelf life is determined by which of the dry ingredients expires first. Store it in an airtight container.

The mix yields 8 servings of hot chocolate. Use 2 tablespoons of the mix for 1 serving of hot cocoa. Then warm the mix with a cup of milk and a splash of vanilla extract. 

Overhead shot of 3 cups of hot cocoa

Toppings for hot cocoa

My favorite hot chocolate toppings are miniature marshmallows and whipped cream, used interchangeably (and sometimes together.) I like to dust a little ground cinnamon on top as well. Chocolate shavings are a fun garnish too!

Depending on my mood, I’ll add a small scoop of ice cream into the hot chocolate mug. It will slowly melt, and it makes the hot cocoa even creamier. 

I can tell you’re a fan of chocolate. My Chocolate and Cookie Butter Pudding Pie is another great option to satisfy your sweet tooth!

Close up picture of 3 mugs full of hot chocolate
Print Recipe
5 from 15 votes

Chocolate Hazelnut Hot Cocoa

A cup of creamy hot cocoa made with chocolate hazelnut spread and a hint of cinnamon is a great way to warm up!
Prep Time1 minute
Cook Time5 minutes
Course: Dessert, Drinks, Snack
Cuisine: American
Keyword: chocolate, chocolate hazelnut, chocolate hazelnut spread, drinks, hazelnut, hot chocolate, hot cocoa, nutella, warm drinks
Servings: 1 cup
Author: Crystal

Equipment

  • Small saucepot
  • Whisk
  • coffee mug

Ingredients

  • ¼ teaspoon ground cinnamon
  • 2 teaspoons granulated sugar
  • A pinch of salt
  • 4 teaspoons cocoa powder
  • 8 ounces milk
  • ½ teaspoon vanilla extract
  • 2 tablespoons chocolate hazelnut spread

Instructions

  • In a small sauce pot, whisk together the cinnamon, sugar, salt, and cocoa powder.
  • Slowly pour the milk into the pot while whisking to dissolve the dry ingredients. Add vanilla and chocolate hazelnut spread.
  • Warm the ingredients on medium heat, stirring occasionally with a whisk to help the chocolate spread melt.
  • After about 5 minutes, the liquid will begin to steam. Immediately remove from the heat.
  • Pour the hot chocolate into your favorite mug. Top with marshmallows or whipped cream.

Easy and Creamy Chicken and Dumplings

Chicken and dumplings in a bowl with veggies in the background

There’s nothing like a big bowl of creamy chicken and dumplings to warm you up during the winter months. 

In 40 minutes, you can have a comforting meal on your table with ingredients in your fridge and pantry RIGHT NOW! Perfect weeknight meal, it’s such a simple and filling recipe with a lot of flavor. 

Overhead shot of a bowl of chicken and dumplings in a bowl with veggies off to the side

What are chicken and dumplings?

Chicken and dumplings is a soup made of shredded chicken and vegetables cooked in a flavorful broth. The dumpling is a biscuit dough that steams in the simmering soup.

The soup can be made a couple of ways, which is to your liking. The broth for chicken and dumplings is usually thick but can be made thinner by adding more stock. A touch of dairy is added to make the broth creamy and silky, which can be omitted if you prefer. 

Also, the dumplings can be scooped into any size. It’s common for them to be portioned about 1 ounce (or 2 tablespoons), but can be made much smaller, or even the size of a biscuit!

Side view of a bowl full of chicken and dumplings

What chicken should I use for chicken and dumplings?

Boneless and skinless chicken is best when making chicken and dumplings. The chicken gets shredded once cooked, so using bone-in chicken with the skin still attached is useless.

I prefer to use chicken thighs when cooking. It’s a bit more juicy than chicken breasts, giving it a bit more flavor. If chicken breasts are all you have available, no worries. It will still hold flavor when cooking in the broth. 

How to make the dough for chicken and dumplings

Biscuit dough is commonly made with cold ingredients, which creates those fluffy layers we love. However, the ingredients do not have to be chilled for dumplings.

Thoroughly mix together your dry ingredients in a bowl. Then, pour in your milk and melted butter. Stir these ingredients until just incorporated. The dough should be soft and able to be scooped up with a spoon. 

Dumpling mix for chicken and dumplings in a bowl

Cooking the dumplings

The biscuit dough is easier to scoop with a wet utensil. I use a spoon, but a cookie scoop will ensure evenly portioned dumplings.

With a wet spoon,  scoop out the desired amount of dough and immediately drop it into the simmering broth. Continue scooping the dumplings with a wet spoon until all of the dough is added, dropping each dough ball next to each other. 

Scoop of dumpling dough for chicken and dumplings
Individually drop each dumpling into the soup with a wet spoon or scoop

Once the dumplings are in the broth, cover and simmer on low for 10 minutes, gently flipping halfway through cooking with a spoon. The dumplings evenly cook with the steam, while the broth adds more flavor. 

Dumpling mix in broth for chicken and dumplings
Once all the dumplings have been added to the soup, cover and cook on low.
Partially cooked dumplings in broth for chicken and dumplings
Flip the dumplings to finish cooking

Why are my dumplings so dense?

Just like any dough, you want to avoid over mixing. Mixing dough and batter too much creates more gluten, making it chewy and dense when cooked.

To prevent a dense dough, make sure all of the dry ingredients are thoroughly mixed before adding the wet ingredients. It also helps to mix the wet ingredients separately before pouring into the dry. Lastly, mix the wet and dry ingredients until just combined. 

Why did my dumplings fall apart while cooking?

If your dumplings break apart while they are cooking, the broth may be simmering too rapidly. You want to go for a low simmer. 

If the dumplings are breaking apart when flipping them over in the broth, there’s a chance they’ve touched the bottom of the pot. To fix this, add a half a cup of water or stock. Individually scrap up each dumpling with a spatula. Once they’ve been freed, proceed with individually flipping the dumplings with a spoon.

Chicken and dumpling ingredient substitutions 

In the dumplings, shortening or oil can be swapped for the butter.

Coconut milk can replace the milk in the dumplings.

Coconut milk can also replace the heavy cream in the soup. It can be completely omitted since the soup will have a smooth and thick consistency from the flour added early on. 

Chicken and dumplings are also a great way to use up leftover chicken, as well as turkey! Skip the step for searing the raw chicken. Add the shredded chicken after the broth has simmered for 15 minutes. 

Close up of chicken and dumplings in a bowl

Keep this recipe in your rotation of “what should I make for dinner tonight?” meals. Would love it if you shared your creations with me on Instagram or Twitter!

Looking for a few more easy weeknight meals? Cheesy Chicken Parmesan with Homemade Marinara Sauce and Smothered Hamburger Steaks with Mushroom Gravy are both amazing choices!

Close up of a bowl of chicken and dumplings
Print Recipe
5 from 4 votes

Creamy Chicken and Dumplings

There’s nothing like a big bowl of creamy chicken and dumplings to warm you up during the winter months.
Prep Time5 minutes
Cook Time35 minutes
Course: Main Course
Cuisine: American
Keyword: chicken, chicken and dumplings, dinner, dinner ideas, dumplings, easy meal, weeknight dinners
Servings: 6 servings
Author: Crystal

Equipment

  • 4 quart pot with a lid
  • wooden spoon
  • Tongs
  • Fork or knife with cutting board
  • Small metal spoon or cookie scoop

Ingredients

Creamy Chicken Soup

  • 3 tablespoon canola oil
  • 1.5 pound chicken thighs boneless and skinless
  • 2 teaspoons kosher salt
  • ½ teaspoon ground black pepper
  • 1 cup small diced carrots
  • ½ cup small diced onions
  • 2 garlic cloves minced
  • 3 tablespoons all purpose flour
  • 4 cups chicken broth
  • 1 bay leaf
  • 1 sprig thyme
  • ¼ cup heavy cream

Dumplings

  • 1 ¼ cup all purpose flour
  • 2 teaspoon garlic powder
  • ½ teaspoon onion powder
  • ¼ teaspoon paprika
  • 1 ½ teaspoon baking powder
  • ½ teaspoon kosher salt
  • ½ cup milk
  • 4 tablespoons melted butter

Instructions

For the soup:

  • In a 4 quart pot, heat vegetable oil on medium heat.
  • Season the chicken thighs with 1/2 tablespoon of salt and 1/4 teaspoon of black pepper, reserving the remaining salt and pepper.
  • Sear the chicken in the pan for 4 minutes, flipping halfway through cooking. Remove the partially cooked chicken from the pot and set aside.
  • Add the diced carrots and onions and cook for 2 minutes, stirring occasionally. Add the minced garlic and cook for 30 seconds while stirring.
  • Sprinkle the flour over the cooked veggies, and mix together for 1 minute.
  • Pour 1 cup of the chicken stock in with the veggies and stir to combine. The mixture will thicken while simmering. Pour in the remaining chicken stock and whisk.
  • Add the reserved salt and pepper, the seared chicken thighs, bay leaf, and thyme. Stir to combine.
  • Turn the heat to low. Cover and simmer for 15 minutes.
  • Remove the cooked chicken thighs, bay leaf, and thyme. Shred the meat with forks or a knife. Add the shredded chicken back to the soup.

Dumplings:

  • In a medium sized bowl, mix together the dry ingredients.
  • Pour in wet ingredients and mix together with a wooden spoon.

Soup Assembly:

  • With a soup spoon, scoop out a heaping spoonful of the dumpling batter. Gently drop the batter into the soup. Repeat until all the batter has been added, placing each scooped dough next to each other in the pot.
  • Cover and simmer for 5 minutes.
  • Uncover and pour in the heavy cream. Gently flip over each of the partially cooked dumplings with a spoon. Cover and simmer for 5 more minutes.
  • Serve immediately.

Notes

For dairy free alternatives, see notes above. 

Pin It on Pinterest