Easy Cinnamon Roll Pancakes with Vanilla Icing

Side shot of a stack of cinnamon roll pancakes with a bite to the side

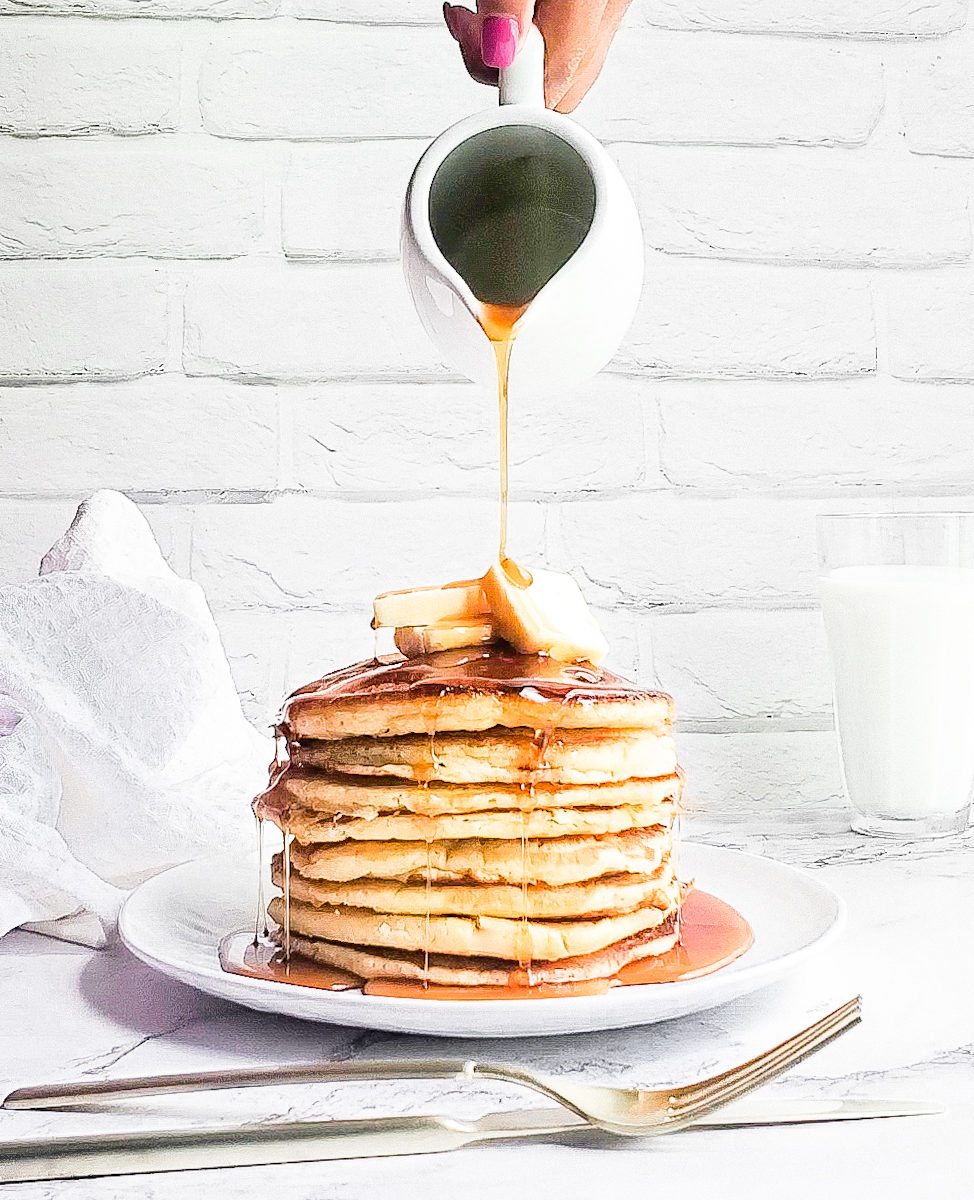
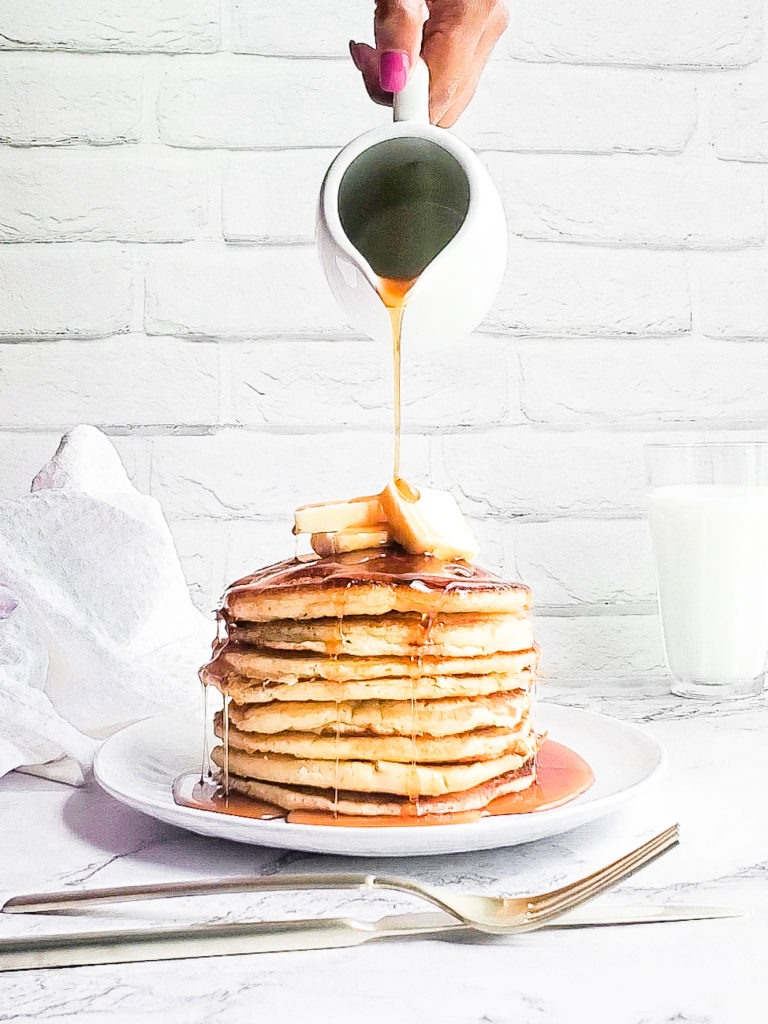
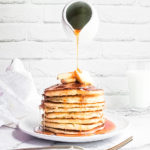
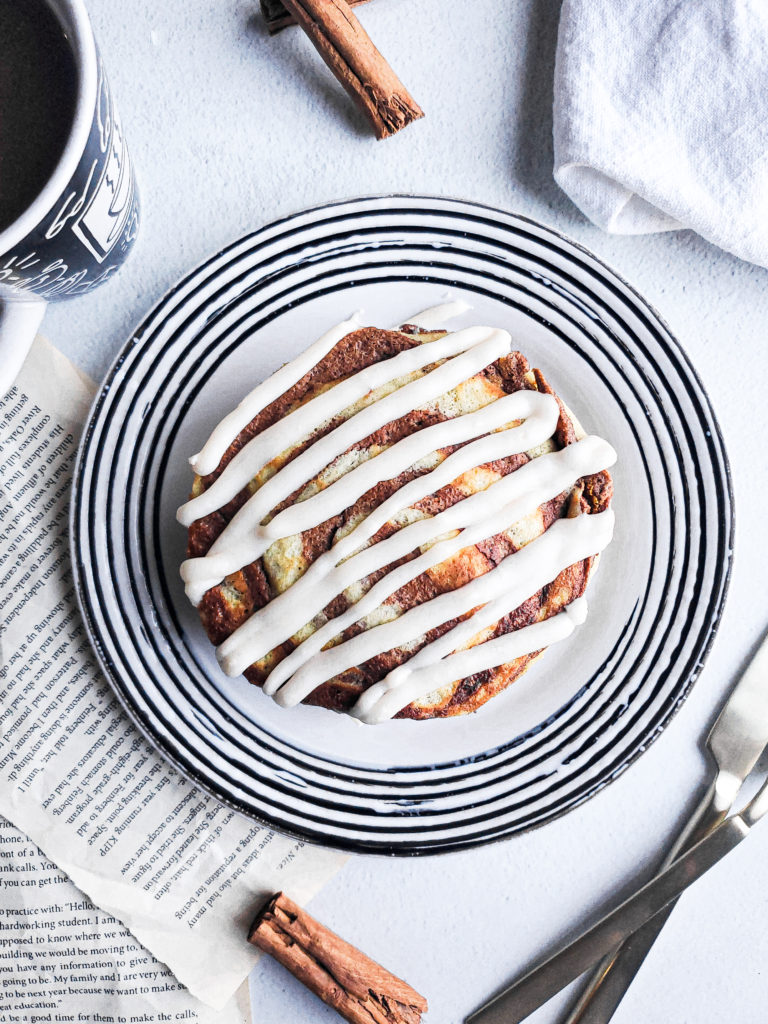
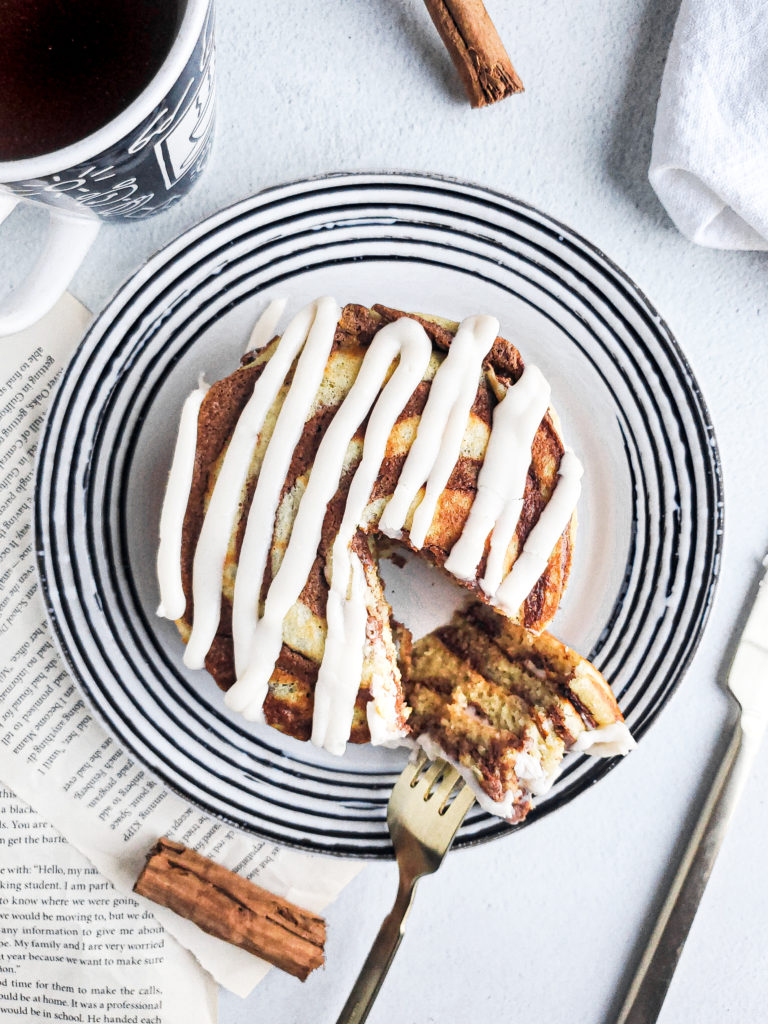
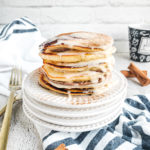
If you’re in the mood for cinnamon rolls, but don’t have the time or skill to make it, Cinnamon Roll Pancakes with a Vanilla Icing will be the perfect fix!

I’ve mentioned it before….I am NOT a baker! A lot of the recipes you’ll find on my site are definitely for the novice bakers like myself. I may (or may not) tackles homemade cinnamon rolls one day. But in the meantime, these cinnamon roll pancakes will do the job!

Overhead shot of a stack of cinnamon roll pancakes

What makes these pancakes, cinnamon roll pancakes???

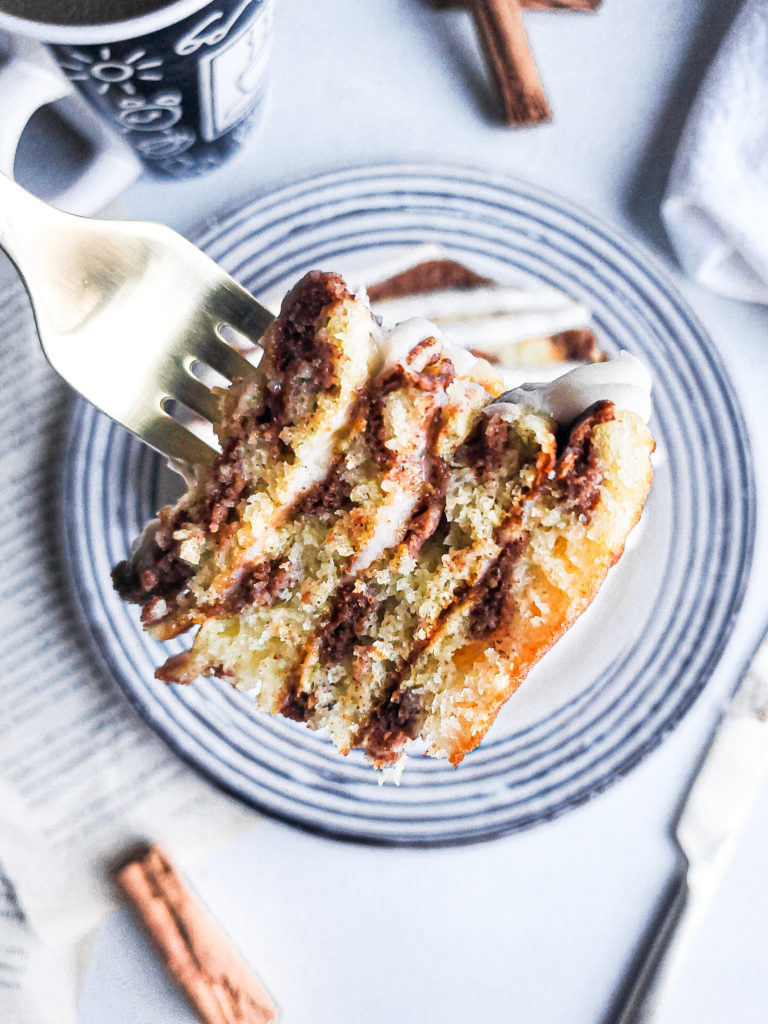
I added a cream cheese swirl into my classic buttermilk pancake recipe while it’s cooking. Spread the thick vanilla glaze on the warm pancakes once finished. So all the components of a cinnamon roll are there, but in the ease of making a batch of pancakes!!!

How do I make pancakes?

Lucky for you, I have a step-by-step guide for making an awesome batch of pancakes. This ranges from putting together the batter itself, to cooking, and even storage!

The guide can be found here, along with another one of my yummy pancake recipes! (Hint: they’re red!)

Close up of a bite of cinnamon roll pancakes

How to make the cream cheese filling

It’s pretty simple to make any cream cheese filling! Softened cream cheese is whipped until smooth, then any flavoring of choice gets added and whipped as well. However, with this recipe, a little pancake batter gets mixed in as well. Why???

If the whipped cream cheese gets directly swirled into the pancake batter while it’s cooking, it oozes out a bit from the heat melting the cheese. While it’s still delicious, it may be a bit of a mess. Adding a little pancake batter helps the filling to also become a batter,  keeping the pancake held together. 

How to add the cream cheese filling to the cinnamon roll pancakes

Once the cream cheese mixture is put together, it gets scooped into a piping bag to squeeze into the pancakes while cooking. There is a little trick I like to use to make it easier to get the filling into the bag without making a huge mess, which also frees up one of my hands.

Place the piping bag into a cup, with the opened end of the bag facing up. Next, take the ends of the bag and fold it over the entire lip of the cup. This will keep the bag open so the filling can be put in with ease!

Overhead shot of cinnamon roll pancakes with a bite to the side and a cup of coffee

I don’t have a piping bag. What should I use as a replacement?

Also, piping bags are something that everyone does not readily have available at home, including myself. Don’t stress! I know there’s at least a sandwich baggie available!

Still follow the steps above of placing the bag in the cup to fill. Once filled, close the bag by either tying the opened end into a knot (or with the zipper if using that type of baggie.) Then snip a small corner of the bag. You’ll still be able to pipe the cream cheese filling into the pancakes like a pro!

My cinnamon roll pancakes with vanilla icing may or may not be your go-to when there’s a cinnamon roll craving in your home. I’d love to see your creation by tagging me on Instagram if you get a chance to make it! Don’t forget to also leave a review!!!

Sooooo, you’re in the mood for pancakes. Well, you should check out these recipes for Classic Buttermilk Pancakes, Red Velvet Pancakes with Cream Cheese Topping, and Lemon Ricotta Pancakes!

Stack of cinnamon roll pancakes
Print Recipe
5 from 7 votes

Cinnamon Roll Pancakes with Vanilla Icing

Fluffy cinnamon roll inspired pancakes spread with a thick vanilla icing!
Prep Time10 minutes
Cook Time30 minutes
Course: Breakfast
Cuisine: American
Keyword: breakfast, brunch, cinnamon, cinnamon roll, easy dessert, glaze, pancakes, roll, vanilla, vanilla glaze
Servings: 8 pancakes
Author: Crystal

Equipment

  • Griddle or cast iron skillet
  • Mixing bowls
  • Whisk
  • Handheld mixer with whip attachment
  • Measuring cup
  • Piping bag (see notes above)

Ingredients

Cinnamon Roll Pancake

  • 1 cup all purpose flour
  • ½ teaspoon kosher salt
  • ¼ cup granulated sugar
  • 1 teaspoon baking powder
  • ½ teaspoon baking soda
  • 1 cup buttermilk
  • 1 egg
  • 3 tablespoons melted butter
  • ½ cup cream cheese softened
  • 2 tablespoons ground cinnamon
  • 2 tablespoons dark brown sugar
  • olive oil or butter for cooking

Vanilla Icing

  • 2 cup powdered sugar
  • 2 tablespoon melted butter
  • 2 tablespoon milk
  • 2 teaspoon vanilla extract

Instructions

Cinnamon Roll Pancakes

  • Preheat a griddle or cast iron pan on a stove to the setting above it’s lowest setting.
  • While the griddle is heating, In a large bowl, whisk together the flour, salt, sugar, baking powder, and baking soda. Set aside.
  • In a small bowl, whisk together the egg and milk.
  • Pour the milk mixture in with the flour mixture. Gently whisk for about a minute to combine. Batter should be slightly lumpy and thick.
  • In a separate bowl, whip the cream cheese with a mixer on low for 1 minute, or until smooth.
  • Add cinnamon, brown sugar, and a half cup of the pancake batter. Whip on low for an additional minute, or until thoroughly combined.
  • Scoop the cream cheese mixture into a piping bag. Cut off a small corner of the tip of the piping bag. Set aside.
  • Add the melted butter to the mixture. Stir to incorporate.
  • Heat a small amount of butter or oil in the griddle, just enough to coat the surface.
  • Pour a little under a quarter cup of the pancake mixture onto the griddle. Spread out the mixture to make pancakes a little thinner and rounder. If cooking multiple pancakes at a time, be sure to keep them at least an inch apart.
  • Immediately pipe the cream cheese mixture into the uncooked pancakes by gently squeezing the middle of the piping bag. The mixture can either be added in zigzags or swirls.
  • Cook pancakes for 3-4 minutes on it’s first side. The uncooked side will create little holes and look a little dry. Once it’s at that point, flip and cook for 1 more minute.
  • Drizzle the warm pancakes with the vanilla glaze.

Vanilla Icing

  • Combine all ingredients in a small bowl with a whisk. Set aside until ready to serve.

Notes

Light brown sugar can be replaced for dark brown sugar.
If you do not have a piping bag, see the notes above. 

Buttermilk Cheddar Biscuits with Scallions

Cheddar scallion biscuits on a plate

If you’re looking for a savory breakfast biscuit, I’ve got you covered. My buttermilk cheddar scallion biscuits are the perfect addition to your breakfast needs!

These cheddar scallion biscuits are something you’ll definitely want to keep in rotation for breakfast or brunch. It’s also a great side dish for dinner! Or, if you’re like me, it’s great to randomly snack on during the day! I’ve also added a hint of garlic to the recipe, because….well, why not???

Stack of cheddar scallion biscuits on a plate
Cheddar scallion biscuits

How to make homemade biscuits

Making biscuits from scratch may seem a bit scary in the beginning (talking to myself here). But after learning some simple tricks to making the dough, you’ll want to make a batch of biscuits every day! 

It’s also so so simple to make biscuits from scratch, that it’s actually a bread recipe where your measurements do not have to be exact! Being someone that likes to eyeball their measurements and is also NOT a baker, I love the ease of putting together a biscuit recipe. But, as a guide, I’ve created an actual recipe for ya!

You simply mix chunks of butter with a flour mixture, then add your milk of choice. If there’s additional flavors or seasonings you’d like to add, it’ll get tossed in before the milk.

Tips to making a great batch of biscuits

While biscuits are pretty simple to execute, there are a few small tips to making a batch go from “Mmmmmmm!” to “MMMMMMMMMMMMM!

Keep your cold ingredients cold!

The most important tip when it comes to making a batch of biscuits is to keep all of your refrigerated ingredients in the fridge until it’s ready to be used for the dough. I usually measure out what’s needed, then tuck it back in the fridge. Even if I plan on using it within 5 minutes, I keep it cold until the very last second. 

Using cold ingredients helps to create those layers that we all love biscuits for. You really want to avoid letting your cold ingredients get to room temperature. If this happens, your biscuits will not create those layers, and can also be a bit dense once baked.

Measure out your milk of choice and butter, and keep it in the fridge until ready to use. 

Grate your butter!

If you have time, freeze your butter for about 15 minutes. Then get a grater, and grate the butter like it’s cheese! This is a fun trick to get the butter into small enough pieces without getting the butter too warm with your body heat or having it sit at room temperature.  

If you do not have a grater available, you can cut the butter into a pea size amount with a knife before putting it back in the fridge to chill. 

Another option is to first cut your butter into larger chunks, then use a bladed dough blender to break the butter up into tinier pieces directly into the flour while the bowl. It’s a pretty cool tool to use too!

There’s also the option to cut and break the butter up into those smaller pieces with your fingers. But again, since we want to keep the cold ingredients cold, this should be a last resort. So the previous options are the better way to go.

Create even more layers in your biscuits!

Another trick to getting those flaky layers in biscuits is to create them!

To do this, you’ll flatten the mixed dough onto a floured surface to an inch thick with a rolling pin, forming a rectangle. Next, you’ll fold that rectangle in half on top of itself, like folding a book together. Rotate that folded dough a quarter of a turn, flatten the dough out again, and repeat the folding process 4 additional times (5 folds in total.) Using a bench scraper is very helpful with getting the dough off the counter to be folded. 

Do this quickly though, since you do want to keep the ingredients in the dough as cold as you can before baking. This will take about 3 minutes to do.

What to serve with cheddar scallion biscuits

These cheddar scallion biscuits are delicious on their own! I love to slice one open and spread some butter onto it. Sooo good!

It’s also perfect for making breakfast sandwiches, or even to accompany a sausage gravy to make the ultimate biscuits and gravy brunch meal! (recipe coming soon for the sausage gravy!)

I hope you have as much fun making (and eating) my cheddar scallion biscuits like I did!

Cheddar scallion biscuits on a plate
Print Recipe
5 from 9 votes

Buttermilk Cheddar Scallion Biscuits

My flaky cheddar scallion biscuits are the perfect addition to your breakfast needs!
Prep Time5 minutes
Cook Time30 minutes
Total Time35 minutes
Course: Appetizer, Side Dish, Snack
Cuisine: American
Keyword: bay biscuits, biscuit, biscuits, cheddar bay biscuits, cheddar biscuit, cheddar biscuits, red lobster biscuits
Servings: 8 biscuits
Author: Crystal

Equipment

  • sheet pan
  • parchment paper
  • Mixing bowl
  • wooden spoon
  • Rolling Pin
  • Bench scraper
  • Bladed dough cutter or grater
  • pastry brush

Ingredients

  • 2 ¾ cup all purpose flour plus extra for dusting
  • 1 tablespoon baking powder
  • 1 tablespoon garlic powder
  • 1 teaspoon salt
  • 4 scallions sliced thin
  • ½ cup shredded cheddar cheese
  • ½ cup unsalted butter kept cold
  • 1 cup buttermilk kept cold
  • 2 tablespoons melted butter

Instructions

  • Preheat the oven to 400 degrees. Line a small sheet pan with parchment paper. Spray the parchment with pan spray and set aside.
  • In a large mixing bowl, thoroughly whisk together the flour, baking powder, garlic powder, and salt.
  • Toss in the scallions and shredded cheese and coat with the flour mixture.
  • Grate the cold butter into the flour, and coat with the flour mixture with a wooden spoon.
  • Pour the milk into the center of the flour mixture. Slowly mix in the flour with the wooden spoon to incorporate. Then use your hands to thoroughly mix until the dough is formed. Dough may be slightly wet.
  • Take a couple of spoonfuls of flour and dust onto the countertop. Dump the dough onto the flour. Dust a little more flour on top of the dough. Roll the dough out to an inch thick.
  • Fold the rolled out dough in half like a book. Rotate the folded dough a quarter of a turn, and roll the dough to an inch thick. Fold and rotate the dough a total of 5 times, flouring the counter top as needed.
  • After folding the dough one last time, roll out to 1 inch thick and cut into desired biscuit sizes. Place biscuits onto the parchment lined sheet pan.
  • Bake for 15 minutes, rotating halfway through baking.
  • Remove from the oven. Brush with melted butter and serve.

Classic Buttermilk Pancakes

Stack of pancakes with butter being drizzled with syrup

Can never go wrong with a nice fluffy stack of some classic buttermilk pancakes. Amiright? I am right. Keep it classy, not trashy.

Stack of buttermilk pancakes with butter being drizzled with syrup

How do I make classic buttermilk pancakes?

Cooking pancakes definitely seems intimidating at first. But please don’t freak out with this recipe. It really is sooooo simple to do. As a quick summary:

  1. Mix your batter, and let it sit for a few minutes before cooking
  2. Preheat your griddle or cast iron skillet
  3. Add a thin layer of your fat of choice
  4. Pour in the desired amount of batter
  5. Cook one side of the pancake for a few minutes, then flip to cook the other side for one more minute. 

I’ve created a much more detailed breakdown of the pinpoints listed above, which can be found here, along with pictures! You’ll also find a really yummy red velvet pancake recipe there too!

What toppings can I add to my pancake batter?

What I love about this recipe is that you can jazz up the batter with additional toppings! 

I love to add a couple of handfuls of chocolate chips to satisfy that chocolate craving that I pretty much always have. To make the batter itself a little sweeter, add a half a teaspoon of vanilla extract.

You can also throw in some sprinkles to serve these to the little ones, or yourself if you’re in the mood to be a big kid. I would add a half teaspoon to this batter for this modification as well.

Adding a cup or two of berries are a great addition too if you’re looking to be fake healthy! Either fresh or thawed frozen berries will do. 

But sometimes, it’s cool to  keep it classy and not trashy. Go ahead and test this recipe out the traditional way. I ain’t gonna be mad at ya!

What should I put on top of my buttermilk pancakes?

Honestly, the best way to serve these yummy buttermilk pancakes with a slice of butter and warm maple syrup!

Similar to adding your fav berries into the batter itself, it can be added as a garnish when serving the pancakes too. 

How to store cooked pancakes

I like to make a few batches of pancakes to freeze for later. When reheated, it’ll taste just as good as it did when serving it on the day off. To do this:

  • Completely cool your pancakes to room temperature.
  • Place the pancakes into a freezer safe ziploc bag. 
  • Optional: if you have deli or parchment paper, it can be placed between each pancake before freezing
  • Write a date onto the bag and freeze.

When you’re ready to serve the frozen pancakes, you’ll do the following:

  • Place frozen pancakes into one layer on a microwave safe dish.
  • Place a damp paper towel over the frozen pancakes. 
  • Microwave for 45 seconds for a single pancake, or 1 minute for multiple pancakes at once. Microwave for an additional 15 seconds if needed.

The steam created from the damp paper towel will help to add some moisture into the pancake while it’s warming up. 

I hope you get a chance to test out my classic buttermilk pancakes! If you do, I’d love it if you left a review. Also be sure to tag me on Instagram!

If you’re looking for more breakfast inspo, check out my lemon ricotta pancakes!

Classic Buttermilk Pancakes

Can never go wrong with a nice fluffy classic buttermilk pancake. Amiright? I am right.
Cook Time30 minutes
Course: Breakfast
Cuisine: American
Keyword: breakfast, brunch, buttermilkpancake, pancake, pancakes
Servings: 4 servings
Author: Crystal

Equipment

  • Mixing bowls
  • Whisk
  • Cast iron skillet or griddle
  • spatula
  • pastry brush

Ingredients

  • 1 cup all purpose flour
  • ½ tsp kosher salt
  • 2 tbsp granulated sugar
  • 1 tsp baking powder
  • 1 cup buttermilk
  • 1 eggs
  • 3 tbsp melted butter
  • olive oil for cooking the pancakes

Instructions

  • Preheat a griddle or cast iron pan on a stove to the setting above it’s lowest setting.
  • While the griddle is heating, In a large bowl, whisk together the flour, salt, sugar, baking powder, and baking soda. Set aside.
  • In a small bowl, whisk together the egg and milk.
  • Pour the milk mixture in with the flour mixture. Gently whisk for about a minute to combine.
  • Add the melted butter to the mixture. Stir to incorporate. Batter should be slightly lumpy and thick.
  • Spread small amount of olive oil in the griddle with a pasty brush, just enough to coat the surface.
  • Pour a quarter cup of the pancake mixture onto the griddle. Spread out the mixture to make pancakes a little thinner and rounder. If cooking multiple pancakes at a time, be sure to keep them at least an inch apart.
  • Cook pancakes for 4-5 minutes on it’s first side. The uncooked side will create little holes and look a little dry. Once it’s at that point, flip and cook for 1 more minute.
  • Serve with melted butter and maple syrup. Enjoy!

Pin It on Pinterest