Creamy Roasted Mushroom Risotto + A Beginner’s Guide

Close up of a pan full of mushroom risotto with a wooden spoon

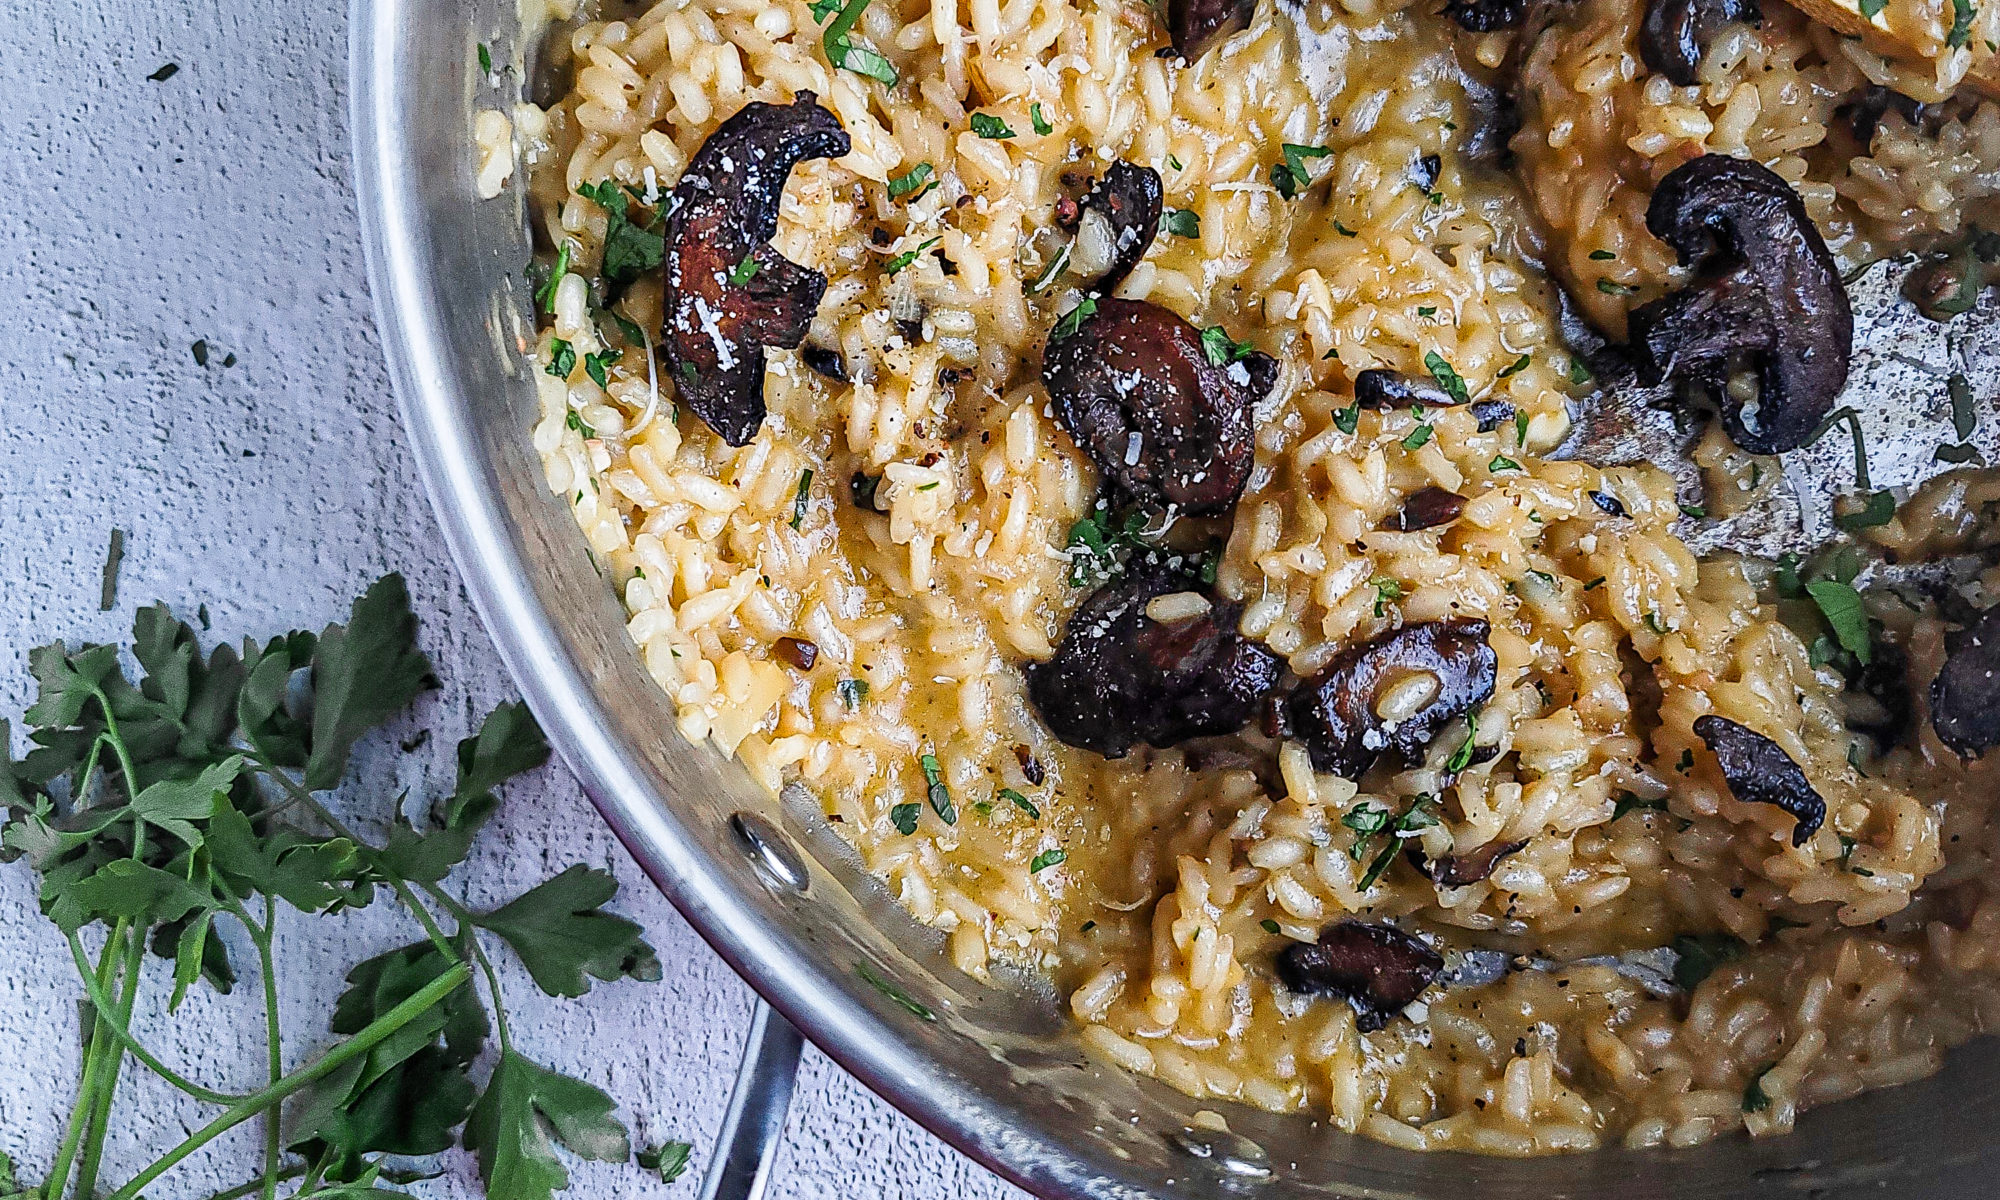
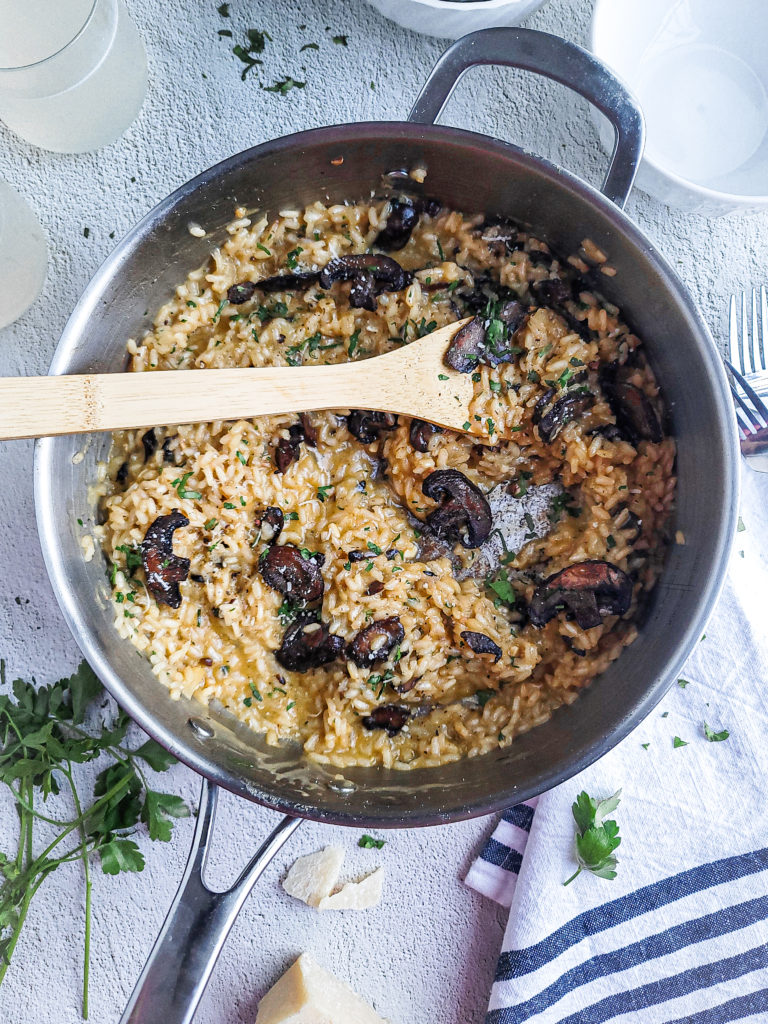
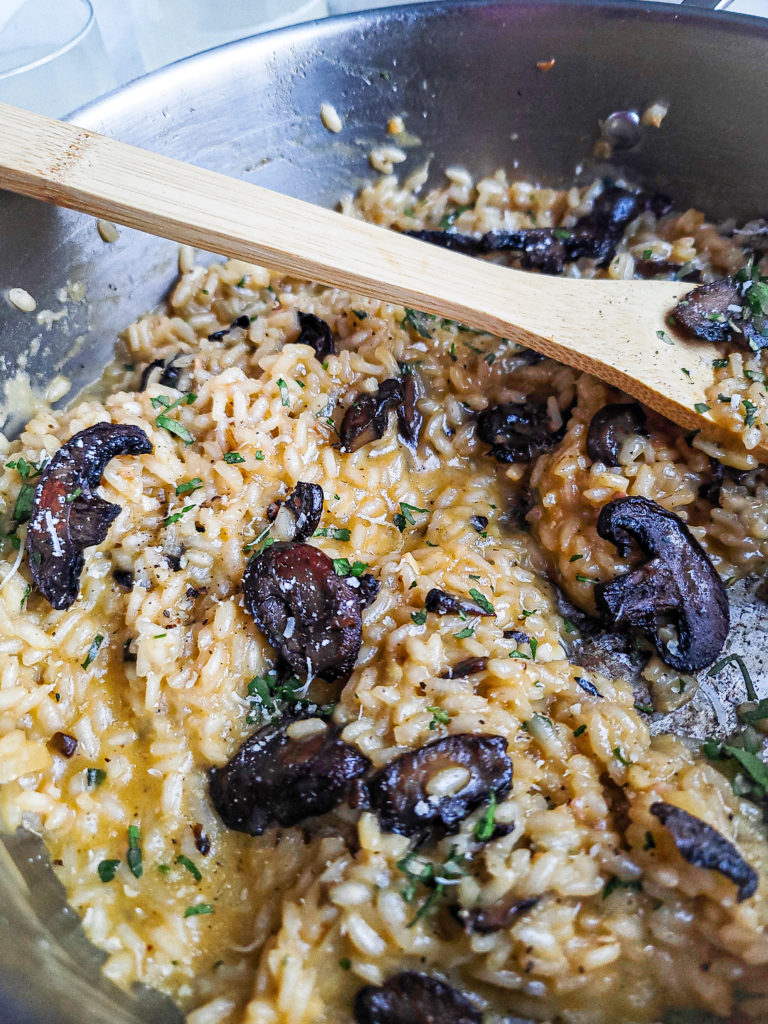
A warm bowl of mushroom risotto is great as a vegetarian entree, or a side dish to meat and fish. The roasted mushrooms and addition of mascarpone cheese make for a restaurant-quality dinner!

Close up of a pan full of mushroom risotto with a wooden spoon

Mushroom risotto may seem like a difficult dish to make. But in reality, it’s so easy to execute. The only “difficult” part is the length of hands-on cooking. It takes some time to cook, and directions look tedious.

This is not a pot of rice left alone on the stovetop or made in a rice cooker. But don’t be scared! Risotto is a meal that requires extra love, which you will taste with the final product. 

The following tips are important for making the perfect pot of risotto. There are some essentials you’ll need to make the best pot of risotto. Then, you’ll be able to make this yummy batch of mushroom risotto, or even your own variations of this Italian dish.

How to cook risotto

Risotto has several easy steps, but takes time to execute

  • The onions are sauteed until soft and translucent.
  • Arborio rice is poured into the pan to lightly toast with the onions.
  • The hot liquid is pour in small amounts into the rice.
  • Stir the rice every few seconds, so it absorbs the liquid.
  • Cheese is added once all the liquid is absorbed.

What type of rice to use for risotto:

Arborio rice is a short-grain rice used to make risotto. It has a lot more starch than the long-grain rice, which is why more attention is needed when cooking. 

When it’s made properly, cooked risotto will be soft and creamy without it being mushy. Stirring the rice is EXTREMELY important for this starchy rice, which I’ll explain below. 

Arborio rice can be found in the rice aisle of your local grocery store. If not there, it can be found in the international aisle with the Italian products. 

Why does risotto take so long to cook?

Risotto needs to cook low and slow, so each grain absorbs the right amount of stock. It should be cooked on medium-low heat. The rice will not cook at too high of a heat, and will become rice pudding at too low of a heat.

The starch also needs to be released from the arborio rice. The rice needs to be constantly stirred at the lower temperature, which takes a bit of time.

What type of pan to use to cook risotto

The pan used to cook risotto is also important. The rice needs to absorb the rice at a certain speed. When fully cooked, arborio rice should have a texture like al dente pasta. The rice will be soft, with a slight bite.

If you use too wide and shallow of a pan to cook risotto, the stock evaporates before the rice can absorb it. This makes the rice crunchy, since there is no liquid to cook. In turn, if a tall pot is used, the rice can take longer to absorb the liquid, causing the rice to steam. The rice will be mushy and starchy.

The best pot to use to cook risotto combines both types of pots mentioned above. You want to use a pan with a little height, 3 to 5 inches tall, to keep your stock from evaporating too quickly. It should also be the width of your burner. 

Why should I use hot stock for my risotto?

Another important factor in cooking risotto is to NOT use cold or room temperature stock! Heat your broth of choice to a simmer, and turn the stove onto it’s lowest setting. Keep the stock warm while making the risotto.

Adding cold stock to the hot risotto will slow down the cooking process. Risotto is a timed dish, so cooling it in any form extends the cooking time, resulting in a mushy pot of rice. And remember…we don’t want that!

Can I add all the stock at once?

The short answer is HELL NO! Now for the explanation:

Arborio rice does not cook like traditional long grain rice. Adding all the stock boils the rice, and it will not absorb the liquid like it’s supposed to. The stock needs to be added in small batches, so the rice takes in the liquid at the proper speed. 

Why do I have to keep stirring the risotto while cooking?

Arborio rice is very starchy. But, the only way for the starch to be released is by stirring. Believe it or not, constantly stirring the rice in stock while cooking creates a creamy texture without any dairy. 

However, it is possible to stir the rice too much. The hot rice will cool down if stirred too frequently. Once the stock is added to the risotto, stir it for about 5 seconds every 30 to 45 seconds. 

Now that you know the science behind it, you can make my creamy roasted mushroom risotto!

Close up of a pan full of mushroom risotto with a wooden spoon

Which mushrooms should I use for mushroom risotto?

There are so many varieties of mushrooms out there. Luckily, you can use whichever ones you’d like! 

Cremini, or baby bella, mushrooms are what’s regularly found in grocery stores. I like to use these for all my cooking. They’re a bit firm and hold up to high heat and liquids. 

What kind of white wine should I use for the risotto?

It’s always best to use a white wine that you do not mind drinking. However, you should use a dry wine instead of sweet, since we’re making a savory dish and not dessert. Chardonnay is my favorite wine to cook with.

Are there any variations for your mushroom risotto?

The risotto can be made without dairy, making it vegan friendly! Omit the butter, grated parmesan, and mascarpone cheese. Luckily, most of risotto’s creamy consistency comes from the cooking process. 

Mascarpone cheese is not widely available in grocery stores. If you choose, it can be omitted. Or, it can be replaced with heavy cream. You want to use one of the 2 to give the risotto the velvety flavor.

The wine can also be left out of the recipe. Make sure you replace the alcohol with the same amount of warm stock. 

What should I serve with the mushroom risotto?

Risotto works an appetizer, entree, and side dish. This particular recipe is vegetarian, making it the perfect main course. Grilled or baked chicken and a side salad would taste great with this.

Yes, this was a lot to take in! Once you make one pot of risotto, you’ll realize how easy it is to execute, and you’ll question why rice intimidated you. Give this recipe a try to impress yourself and your friends!

If you’re looking for another intimidating recipe to tackle, check out these Five Spice Braised Short Ribs with Creamy Slaw. 

Close up of a pan full of mushroom risotto with a wooden spoon
Print Recipe
5 from 10 votes

Creamy Roasted Mushroom Risotto

A warm bowl of mushroom risotto is great as a vegetarian entree, or a side dish to meat and fish.
Prep Time5 minutes
Cook Time1 hour
Course: Appetizer, Main Course, Side Dish
Cuisine: Italian
Keyword: appetizer, dinner, dinner ideas, entree, mushroom, mushrooms, risotto, weeknight dinners
Servings: 4 servings
Author: Crystal

Equipment

  • 1 Cutting board
  • 1 wooden spoon
  • 1 small sauce pot
  • 1 Ladle
  • 1 large pan
  • 1 Baking sheet
  • 1 Mixing bowl

Ingredients

  • 8 ounces mushrooms cleaned and sliced
  • 6 tablespoons olive oil
  • 1 teaspoon kosher salt
  • ½ teaspoon ground black pepper
  • ½ cup yellow onion small diced
  • 2 tablespoons unsalted butter
  • 4 cloves garlic minced
  • ½ cup white wine
  • 1 cup arborio rice
  • 32 ounces vegetable stock
  • ¼ cup grated parmesan cheese
  • 4 tablespoons mascarpone cheese
  • 1 tablespoon chopped parsley
  • 2 teaspoons lemon juice
  • Salt and pepper to taste

Instructions

  • Preheat your oven to 400 degrees. Line a sheet pan with aluminum foil. Mix the mushrooms in a medium size bowl with 4 tablespoons of the olive oil, and the salt and pepper. Pour the mushrooms onto the tray in an even layer, and bake for 25 minutes. Set aside once they are roasted. You will cook the risotto while the mushrooms are roasting.
  • In a small saucepot, heat the vegetable stock to a simmer. Then turn it down to it’s lowest setting to keep warm while making the risotto.
  • In a large skillet, heat the remaining 2 tablespoons of olive oil on medium-low heat.
  • Add the diced onions. Stir the onions while sauteeing to prevent them from getting color. Cook for 2-3 minutes until the onions are soft and slightly translucent.
  • Add the butter and minced garlic. Cook while stirring until the butter is melted.
  • Add the arborio rice into the skillet. Continuously stir for 2 minutes to lightly toast the rice.
  • Pour the white wine in the skillet. Stir until all the liquid has absorbed in the rice.
  • Pour a half of a cup of the warm vegetable stock over the rice. Every 30 seconds, give the rice a stir until most of the liquid has been absorbed. This should take 2-3 minutes.
  • Continue the process of adding a half cup of stock at a time to the rice, and stirring until most of the liquid has been absorbed. The stock will be added to the rice 8 times. Do not add all the stock at once!
  • When you add the last half cup of stock, also add the parmesan and mascarpone cheese, parsley, lemon juice, and the roasted mushrooms. Thoroughly mix to combine and remove from heat.
  • Taste the cooked risotto and season with salt and pepper to your liking.

Rich S’mores Hot Chocolate with Toasted Marshmallows

2 glass jars with smores hot chocolate with roasted marshmallows

S’mores hot chocolate is the perfect combo of two childhood favorites to enjoy during the colder weather. 

2 glasses full of S'mores hot chocolate with toasted marshmallows

Hot cocoa is a staple in the northeastern part of the country. But, global warming is definitely a thing, so the cooler temperatures are country-wide lately. Hot cocoa can be enjoyed just like s’mores, all year round. My s’mores hot chocolate recipe blends both perfectly!

I’m a HUGE fan of both hot cocoa and S’mores, so combining two of my favorites sweet treats was a no brainer. 

What are S’mores?

S’mores are a popular dessert where a piece of chocolate candy bar is sandwiched between two Graham crackers, and roasted marshmallows are sandwiched between the two crackers, which are roasted over a campfire. The toasted marshmallows have a slight caramel flavor. The chocolate bar will melt from the marshmallow’s heat. 

How to make S’mores hot chocolate

You’ll never buy the prepackaged hot cocoa again once you’ve tried this recipe! To make the hot chocolate:

  • Combine all the ingredients in a small sauce pot.
  • Whisk thoroughly while heating over medium heat.
  • Remove the hot cocoa from the heat when it simmers, and pour into your favorite mug.

Graham crackers have a flavor that is hard to mimic without the proper ingredients. It is also a third of the components needed to make S’mores. To get this flavor into the beverage, half of a Graham cracker is crushed into the beverage while it simmers, which dissolves. 

The garnish also makes the drink, of course! Graham cracker crumbs are sprinkled on top of the hot chocolate. Marshmallows are toasted in the drink using a blow torch.

How to toast the marshmallows for the S’mores hot chocolate

S’mores are traditionally made by roasting marshmallows over the flame of a camp fire. Please don’t build a fire to make this recipe.

After they have been added to the hot cocoa, toast the marshmallows with a kitchen torch. 

Kitchen torches are available in different sizes. I used Culinary Jo’s kitchen torch, which I love because of it’s size. The butane for the torch is also refillable!

If there is no torch, the marshmallows can be roasted in the oven. Place the marshmallows onto an aluminum lined tray, and place under the broiler for a few seconds, toasting to your desired color. Add the roasted marshmallows to your hot chocolate with a spoon.

2 glasses full of S'mores hot chocolate with toasted marshmallows with a kitchen torch in the background

What makes the S’mores hot chocolate rich?

The half and half

Most hot chocolate recipes are made with milk, or sometimes with a mixture of milk and water. I wanted this recipe to have a velvety texture. So the hot chocolate is made with half and half. 

Half and half can be found in the dairy aisle of your local grocery. It is made of equal parts milk and heavy cream, and is often used for cooking and coffee. This hot cocoa is thicker and smoother when using the half and half, making it more of a dessert!

If you want a less rich version, the half and half can be replaced with milk. Also, if half and half is not available, use 6 ounces of milk and 2 ounces of heavy cream for the recipe.

The Graham cracker

A graham cracker is added to the hot cocoa while it is simmering. It acts as a thickening agent for the drink.

Can I make the hot cocoa dairy free?

Yes it can! You can use any milk alternatives that you want!

I have another popular hot chocolate recipe that you’ll be sure to love. Check out my Chocolate Hazelnut Hot Cocoa. And once the weather gets warmer, give my No-Churn S’mores Ice Cream a shot!

Rich S’mores Hot Chocolate

A decadent cup of s’mores hot chocolate is the perfect combo of two childhood favorites to enjoy during the colder weather.
Prep Time1 minute
Cook Time5 minutes
Course: Dessert
Cuisine: American
Keyword: chocolate, hot chocolate, hot cocoa, marshmallows, smores, smores hot chocolate, smores hot cocoa
Servings: 1 serving
Author: Crystal

Equipment

  • small sauce pot
  • Whisk
  • coffee mug

Ingredients

  • ¼ teaspoon cinnamon
  • 2 teaspoons dark brown sugar
  • Pinch of salt
  • 1 tablespoon cocoa powder
  • 4 ounces milk
  • 4 ounces half and half
  • 1 teaspoon vanilla extract
  • 2 tablespoons semisweet chocolate chips
  • ½ tablespoon honey
  • 1 graham cracker square crushed
  • Marshmallows and graham cracker crumbs for garnish

Instructions

  • In a small sauce pot, whisk together the cinnamon, sugar, salt, and cocoa powder.
  • Slowly pour the milk into the pot while whisking to dissolve the dry ingredients. Pour in the half and half and vanilla extract, and whisk to thoroughly combine.
  • Add the chocolate chips, honey, and the crushed graham cracker.
  • Warm the ingredients on medium heat, stirring occasionally with a whisk to melt the chocolate chips. After about 5 minutes, the liquid will begin to steam.
  • Once the mixture starts to bubble along the sides of the pot, immediately remove from the heat.
  • Pour the hot chocolate into your favorite mug.
  • Sprinkle with graham cracker crumbs for garnish. Top with marshmallows and toast with a handheld torch.

Notes

See notes above on roasted marshmallows without a torch. 

Hearty and Spicy Beef Chili

Close up shot of chili in a white bowl

Gotta love a nice, huge bowl of warm beef chili on a chilly day! Yes, that was corny, but you get the point though. It’s the perfect meal for the colder weather!

This easy and fool-proof beef chili recipe takes about an hour to make, with about 15 minutes of hands-on cooking. Chili is perfect for Sunday dinner, and tastes even better as leftovers, as the flavors have more time to mellow.

Overhead shot of  a bowl of beef chili with shredded cheese and sour cream

How to make beef chili

Chili is a stew made of ground meat, tomatoes, peppers, beans, and spices. There are many variations of what is in chili. The general cooking process is as follows:

  • First, seared beef is cooked with onions, peppers, and garlic in a large pot.
  • Next, mix the cooked beef with a bit of tomato paste.
  • Then, stir in the crushed tomatoes, beans, and seasonings. 
  • Finally, cover and cook on low for about 45 minutes.

That sounds very simple, right? Well….IT IS!

The best ground beef for chili

Chili is a hearty meal. Using ground beef that is not extra lean is the better option because of this. And fat means flavor. So omitting the fat by using a less fatty ground meat will make a less flavorful pot of chili. So use 70-85% lean ground beef.

Overhead shot of 3 bowls of beef chili with shredded cheese, sour cream, and crackers

Ground beef alternatives for chili

Ground chicken or turkey can replace ground beef if you do not eat red meat. Poultry has a lower fat content, making it a healthier alternative to beef. 

What beans to use for chili

Kidney beans are the best beans for chili.

There are many types of kidney beans available. From canned to dry, and even kidney bean color, it’s your preference. This recipe has canned red and white kidney beans.

Toppings for chili

The wonderful part of eating a big bowl of chili is the plethora of toppings to make your serving unique!

Shredded cheddar cheese is my favorite, and is the most popular. I also love to add a dollop of sour cream, which tames down some spices. The chili is both tangy and creamy, with both toppings.

The chili will have more pizazz if you garnish with fresh herbs like chopped scallions or cilantro.

Additionally, if you’re a fan of spice, top your chili with sliced jalapenos. 

A few crackers or a slice of warm cornbread are great on the side. It can also be crumbled on top of the chili, if you’d like.

This hearty beef chili is a great way to warm up while satisfying your taste buds whether you’re eating it with your family on a cold evening, or saving it for later in the week. 

If you’re looking for another meal for the winter months, check out my Chicken and Dumplings! And don’t forget to share your creations with me on Instagram or Twitter!

Print Recipe
5 from 1 vote

Hearty and Spicy Beef Chili

Gotta love a nice, huge bowl of warm beef chili on a chilly day!
Prep Time10 minutes
Cook Time1 hour
Course: Main Course
Cuisine: American
Keyword: beef, beef chili, chili, cold, comfy, soup, stew
Servings: 8 servings
Author: Crystal

Equipment

  • 4 quart pot with lid
  • wooden spoon
  • knife and cutting board
  • plate

Ingredients

  • 6 tablespoons canola oil
  • 2 pounds ground beef
  • 1 cup diced onion
  • ½ cup diced green pepper
  • 4 garlic cloves minced
  • 4 tablespoons tomato paste
  • 1 cup beef broth
  • 29 ounce can peeled whole tomatoes
  • 15 ounce can tomato puree
  • 1 15 ounce can red kidney beans strained and rinsed
  • 1 15 ounce can pink kidney beans strained and rinsed
  • 1 ½ tablespoon ground cumin
  • 1 ½ tablespoon paprika
  • 1 teaspoon garlic powder
  • 1 teaspoon onion powder
  • 1 tablespoon cayenne pepper
  • ½ teaspoon granulated sugar
  • 1 ½ tablespoon kosher salt
  • 1 ½ teaspoon ground black pepper

Instructions

  • In a 4 quart pot or larger, heat 4 tablespoons of the oil on medium high heat.
  • Add ground beef. Sear until mostly cooked for 5-7 minutes, breaking the larger pieces of ground meat apart with a wooden spoon. Once cooked, remove beef from the pot and set aside.
  • Turn the stove down to medium heat. Add the remaining oil into the pot. Add the onions and green pepper. Cook for 3 minutes, stirring occasionally. Add the garlic, and cook for 1 minute while stirring.
  • Add the tomato paste in with the vegetables. Cook for one minute while stirring.
  • Add the remaining ingredients, stirring to incorporate.
  • Bring the chili to a rapid simmer. Then turn the heat down to its lowest setting. Cover and cook on a low simmer for 45 minutes, stirring occasionally.
  • Serve with your favorite chili toppings. Enjoy!

Pin It on Pinterest